Exploring Blockchain and DevOps Automation with OCI

Navigating the IT landscape for over two decades has taught me one indisputable truth: the industry never stops evolving, and our mindset must evolve with it. Throughout my career, I have seen the transition from on-premises bare-metal servers to virtualization, then to the cloud, and now to the decentralized paradigms of Web3.
While reading documentation and watching tutorials is great, true understanding only comes when you build things from scratch. You need to drop down into the technical trenches, face the errors, and design the architecture. This project was born from that exact desire: a personal engineering sandbox to fuse modern DevOps and Site Reliability Engineering (SRE) practices with blockchain infrastructure.
In this comprehensive guide, I will document my journey of architecting, automating, and deploying an Avalanche node on Oracle Cloud Infrastructure (OCI) using Packer and Terraform.
1. The Core Philosophy: Why This Stack?
Before writing a single line of code, we need to define the problem and choose the right tools. Running a blockchain node is not just about executing a binary file. It is a classic infrastructure challenge. Nodes demand high availability, aggressive disk I/O, secure networking, and consistent compute power.
Why Avalanche?
I chose to explore the Avalanche network because of its unique architectural design. Unlike traditional single-chain networks, Avalanche uses a primary network containing three built-in blockchains (X-Chain, P-Chain, and C-Chain) and allows for the creation of custom Subnets. This complexity makes it a fascinating use case for infrastructure automation.
Why Oracle Cloud Infrastructure (OCI)?
In the cloud provider landscape, OCI is often overlooked, but it has a highly robust network backbone and a very competitive price-to-performance ratio, especially for compute instances and high-performance block storage. For a blockchain node where reading and writing to the database is intense, OCI’s flexible Block Volumes (which allow you to adjust the performance VPU/GB on the fly) are a perfect fit.
Why Packer and Terraform?
To deploy this node reliably, I applied the SRE principle of Infrastructure as Code (IaC) and Immutable Infrastructure.
- Packer creates a static, frozen snapshot of the operating system with all the software installed (Golden Image).
- Terraform provisions the cloud resources (networks, servers, disks) in a declarative, reproducible way.
Here is the high-level representation of the architecture we are building:
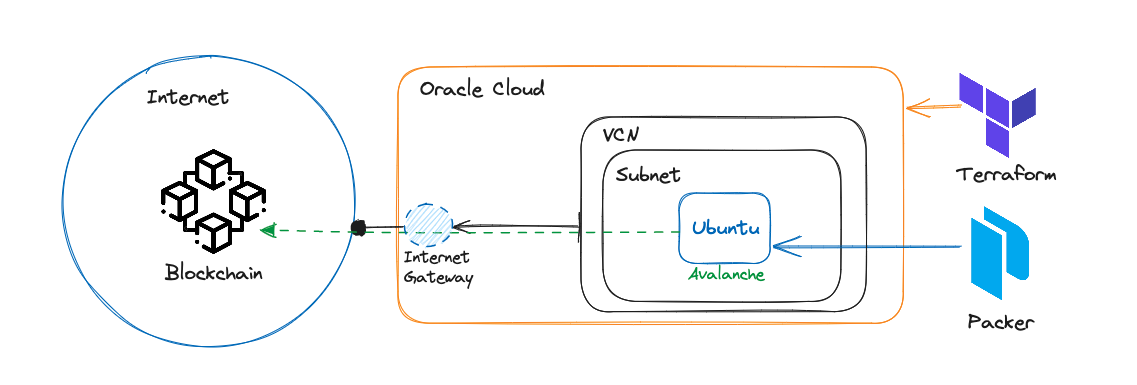
2. Network Design and Security Posture
In any cloud architecture, the network is the foundation. A common mistake when deploying blockchain nodes is exposing too many ports to the internet. Applying a “Zero Trust” and “Least Privilege” mindset is crucial.
Using Terraform, I modeled the network layer to be completely isolated and strictly controlled. The components include:
- Virtual Cloud Network (VCN): The logical boundary for the infrastructure, equipped with a dedicated CIDR block (e.g.,
10.0.0.0/16). - Internet Gateway (IGW): Attached to the VCN to allow outbound traffic (for the node to download updates and sync the ledger) and specific inbound traffic.
- Route Tables: Explicitly routing public traffic through the IGW.
- Security Lists (Firewall Rules): This is where the hardening happens. An Avalanche node requires peer-to-peer (P2P) communication to gossip with other nodes. I configured the Security List to only allow ingress traffic on TCP port
9651(the default Avalanche P2P port). - RPC Protection: The RPC (Remote Procedure Call) port
9650is strictly blocked from the public internet. Exposing the RPC port is a massive security risk. In a production environment, RPC access should only be available via an internal network, a VPN, or a secure SSH tunnel.
This declarative network setup ensures that if the infrastructure is destroyed and recreated, the security posture remains identical and human error is eliminated.
3. Baking the Golden Image with Packer
The old way of deploying servers involved booting a Linux machine, connecting via SSH, and running a massive bash script or Ansible playbook to install software. This takes time, and if a repository goes offline during the process, the server fails to boot correctly.
Immutable Infrastructure solves this. With HashiCorp Packer, I automated the creation of an OCI Custom Image. Think of this as baking a cake: once it’s baked, you can’t take the ingredients out, but you can serve the exact same cake thousands of times.
The Provisioning Pipeline
My Packer template uses an Oracle Linux base image. During the build process, Packer spins up a temporary instance, connects to it, and runs a series of provisioners:
- System Updates and Hardening:
yum update -yto get the latest security patches, installing basic tools likecurl,wget,tar, andjq. - Creating a Dedicated User: Running blockchain nodes as the
rootuser is a terrible practice. The script creates a specificavalancheuser with restricted permissions. - Fetching the Binary: The script downloads the specific version of the AvalancheGo binary from the official GitHub repository, extracts it, and places it in
/usr/local/bin. - Systemd Integration: This is a vital SRE component. I wrote a custom
avalanchego.servicefile forsystemd. This ensures that the node starts automatically when the server boots. More importantly, it handles automatic restarts if the process crashes (e.g.,Restart=alwaysandRestartSec=5), and manages log limits to prevent the disk from filling up.
Once these steps are completed, Packer takes a snapshot of the disk, saves it as a Custom Image in OCI, and destroys the temporary instance. Now, booting a fully functional Avalanche node takes only a few seconds.
4. Infrastructure Orchestration with Terraform
With the Golden Image ready, the next step is orchestration. Terraform is the engine that brings the architecture to life. I organized the Terraform code into logical sections to keep the code clean and maintainable.
Dynamic Data Sources
One of the challenges with OCI is that availability domains and image IDs can change. I used Terraform data blocks to dynamically query OCI for the correct Availability Domain and to fetch the exact OCID (Oracle Cloud Identifier) of the image created by Packer. This makes the code portable.
Decoupling Compute from State (The SRE Way)
This is perhaps the most important architectural decision in the project. Blockchain nodes generate massive amounts of state data (the ledger database). If you store this data on the server’s main boot disk, you create a monolithic dependency. If the OS gets corrupted, or if you need to upgrade the compute instance size, you lose the database and have to synchronize the entire blockchain from scratch—a process that can take days.
To solve this, I designed the Terraform code to provision two separate resources:
- The Compute Instance: Created using our Packer image. This is stateless and disposable.
- A Block Volume: A separate, highly persistent disk attached to the instance via iSCSI or Paravirtualization.
I configured the instance to mount this Block Volume automatically to the ~/.avalanchego/db directory.
The result? If the server fails, or if I want to upgrade the CPU, I can simply use Terraform to destroy the compute instance, spin up a new one, and re-attach the existing Block Volume. The node turns back on and resumes syncing exactly where it left off. This is the essence of resilient systems.
5. Operational Realities: Bootstrapping and Performance
Writing automation is highly rewarding, but operating the system is where you see the reality of your design. Running terraform apply takes about 2 to 3 minutes. The resources are created, the network is linked, and the instance boots.
Once the instance starts, the systemd service initiates the AvalancheGo process. The node immediately begins “bootstrapping” — the process of connecting to other peers and downloading the history of the network.
Monitoring the Bottlenecks
During the bootstrap phase, the demand on the system is extreme. Millions of cryptographic verifications happen, and the disk writes are constant. By monitoring the OCI metrics dashboard, I observed significant spikes in CPU usage and Disk IOPS (Input/Output Operations Per Second).
This validated my decision to use a separate Block Volume. Because OCI allows dynamic performance scaling for Block Volumes, if the node struggles to sync, I can simply adjust the vpus_per_gb parameter in my Terraform code, re-apply the changes, and give the disk higher performance on the fly, without shutting down the server.
6. Reflections and the Road Ahead
Looking back at this project, it represents exactly why I love infrastructure engineering. We started with abstract concepts—decentralization, immutability, declarative infrastructure—and transformed them into a tangible, highly resilient system operating in the cloud.
This lab proves that the principles we use to manage enterprise applications—like separating state from compute, automating builds, and restricting network access—apply perfectly to Web3 environments.
What’s Next?
An engineer’s work is never truly finished. There are several ways to evolve this project:
- CI/CD Pipelines: Implementing GitHub Actions so that whenever Avalanche releases a new version, a pipeline automatically triggers Packer to build a new image and updates the Terraform state.
- Observability: Deploying a Prometheus and Grafana stack alongside the node to collect deep metrics directly from the Avalanche client’s
/ext/metricsendpoint. - High Availability (HA): Using Terraform to spin up multiple nodes behind an internal load balancer to provide HA for RPC requests.
This journey reinforced my belief that to lead in technology, you must never stop experimenting.
Explore the Codebase
I have made this entire project open-source. Whether you are a Cloud Engineer wanting to learn Terraform on OCI, or a Web3 enthusiast trying to run a node professionally, the code is there for you.
Feel free to clone, fork, study, or open issues. Let’s continue pushing the boundaries of automation together.